Tips on Growing & Maintaining Bearded Iris
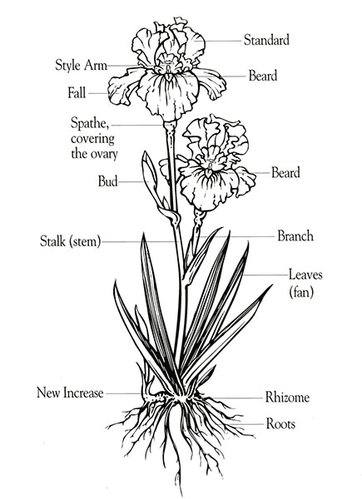
Planting Bearded Iris Soil Preparation: Iris will thrive in most well-drained garden soils. Planting on a slope or in raised beds helps ensure good drainage. If your soil is heavy, coarse sand or humus may be added to improve drainage. Gypsum is an excellent soil conditioner that can improve most clay soils. The ideal pH is 6.8 (slightly acidic), but iris are tolerant in this regard. To adjust the pH of your soil, lime may be added to acidic soils or sulfur to alkaline soils. It is always best to have your soil analyzed before taking corrective measures. When, Where and How to Plant Bearded Iris Rhizomes:
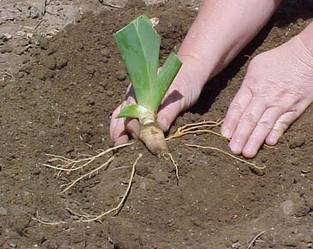
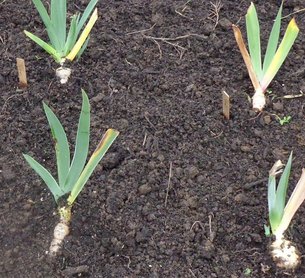
For best results, iris should be planted in July, August or September. It's imperative that the roots of newly planted iris be well-established before the growing season ends. In areas with hot summers and mild winters, September or October planting may be preferred. We strongly suggest iris be planted at least six weeks before the first hard frost in your area. Iris need at least a half day of sun. In extremely hot climates, some shade is beneficial, but in most climates iris do best with at least 6 hours a day of full sun. A full day of sun is even better to keep the rhizomes dry. Iris should be planted so the tops of the rhizomes are exposed and the roots are spread out facing downward in the soil. In very light soils or in extremely hot climates, covering the rhizome with 1 inch of soil may be desirable. Firm the soil around each rhizome and then water to help settle the soil. A common mistake is to plant Bearded Iris too deeply. Iris are generally planted 12 to 24 inches apart. Close planting gives an immediate effect, but closely planted iris will need to be thinned often. Plants spaced further apart will need less frequent thinning. Bearded iris require good air circulation. Do not mulch. Mulching retains moisture, and too much moisture will cause soft rot of the rhizomes. |
|
Fertilizing Bearded Iris
When first planting your rhizome place bone meal in the hole then place rhizome in hole. Specific fertilizer recommendations depend on your soil type, but low-nitrogen fertilizers (6-10-10 or 6-12-12), bone meal, and super-phosphate are all effective. A light application in the early spring when tulips are blooming in your neighbourhood, and a second light application about a month after bloom will reward you with good growth and bloom. Avoid using any fertilizer high in nitrogen, such as fresh manure, because too much nitrogen encourages rapid foliage production instead of blooms, and can lead to rot. If fertilizers are applied, avoid placing them directly on the iris rhizomes as this can burn and injure them. Apply as a top dressing around the plant and work into the soil.
A concise read on the components of fertilizer by Joe Lamp'l on the blog "Growing a Greener World" summarizes nicely, "For promoting good fruit or flower production, look for a middle number that is higher than the first. Otherwise, your plants will be stimulated to put out lots of nice green foliage, likely at the expense of fruit or flower production. Instead, you want the energy and nutrition of the plant to go towards the desired result, flowers or fruit, so a higher middle number is a more appropriate choice."
Bloom Habits
Bearded Iris range from the small to the tall, with the shortest of them beginning to bloom as early as late March here in southern BC. The colour spectacle continues into April with the emergence of the Intermediate Bearded Iris, followed by the Tall Bearded Iris which begin to fade in early to mid-June. Bloom time for each variety lasts approximately two weeks, depending on the weather.
There are some Tall Bearded Iris that bloom early and some that bloom late, so try some of each to lengthen your season by a week or two. Consider some of the smaller Bearded Iris, such as the Intermediate and Standard Dwarf Bearded Iris, as you can add a month to the beginning of your bloom season using these. And finally, consider the re-blooming iris, which can give bloom in the summer and fall.
For iris to bloom consistently, they need full sun, good drainage, lots of space, and quality soil. To improve your chances of bloom, add fertilizer and divide large clumps. Only 60-75% of iris bloom the first year after planting. Sometimes they need an extra year to become established. Unusual weather conditions or late spring frosts can also harm iris blooms.
Re-blooming iris:
Several varieties of Bearded Iris have been known to re-bloom after the initial spring bloom season. These are known as Re-bloomers. All categories of Bearded Iris from the Miniature Dwarf Bearded to the Tall Bearded have varieties that re-bloom, usually 4-8 weeks after initial bloom. Subsequent blooms are not as reliable as the initial bloom, and depend greatly upon the quality of the soil, climate, and geographic location. Re-blooming is not guaranteed.
Floral Arranging with Iris:
For longer lasting flowers cut your iris early in the day with the buds just opening. Place them in a bucket of tepid water and re-cut the stem end underwater at an angle one inch up. Display your iris in a cool niche away from direct sun and drafts. Pinch off and remove wilted flowers immediately. Check the water level every day and replenish as needed.
Tip: Cut iris tend to drip a sap-like substance. The drips from dark iris can stain fabric and other surfaces. We suggest placing an underlay beneath the vase of the irises, or placing the vase on a non-porous surface.
Watering Needs of Bearded Iris
Newly set iris plants need moisture to help their root systems become established. Specific watering information depends on your climate and your soil, but keep in mind that deep watering at long intervals is better than more frequent shallow waterings. Once established, iris normally don't need to be watered except in arid areas. Over-watering is a common error.
Caring for Your Iris Beds
Keep your iris beds clean and free of weeds and debris, allowing the tops of the rhizomes to bask in the sun. Bloom stalks should be cut off close to the base after all buds have finished blooming. Healthy green leaves should be left undisturbed all summer, but diseased or brown leaves should be removed. In the fall, trim the leaves to a height of approximately six inches. Remove weeds, leaf debris, grass roots from Iris beds. In regions with especially cold winters, lay winter protection over the rhizomes. We recommend straw, evergreen boughs, or anything that will provide air circulation and insulation against the cold. Remove winter protection in the spring. During bloom season, spent blooms, as well as spent branches, can be removed carefully to keep your iris beds looking fresh and colourful.
Break off seedpods that form after the blooms have faded. This prevents seedlings from choking the surrounding soil. Seed formation also saps energy needed by the rhizomes, roots, and leaves.
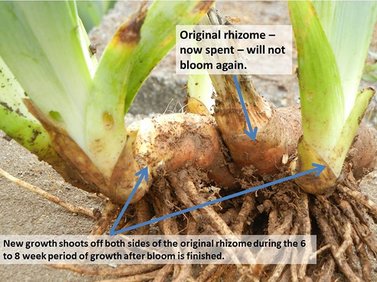
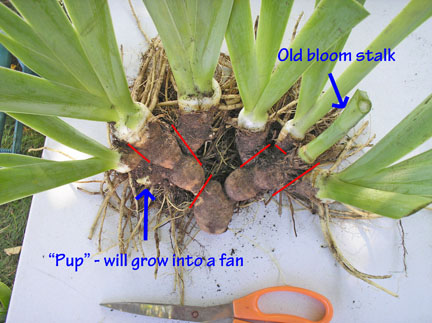
Dividing and Transplanting Bearded Iris
Iris need to be thinned or divided before they become
overcrowded, generally every 3-5 years. If iris are allowed
to become too crowded the bloom will suffer, some
varieties may crowd others out and disease problems may
be aggravated. Depending on your location, July through
September is the time to divide and transplant Bearded Iris.
Transplanted Iris should be planted a minimum of six weeks before the first hard frost in your area.
Newly set iris plants need moisture to help their root systems become established. Specific watering information depends on your climate and your soil, but keep in mind that deep watering at long intervals is better than more frequent shallow waterings. Once established, iris normally don't need to be watered except in arid areas. Over-watering is a common error.
Caring for Your Iris Beds
Keep your iris beds clean and free of weeds and debris, allowing the tops of the rhizomes to bask in the sun. Bloom stalks should be cut off close to the base after all buds have finished blooming. Healthy green leaves should be left undisturbed all summer, but diseased or brown leaves should be removed. In the fall, trim the leaves to a height of approximately six inches. Remove weeds, leaf debris, grass roots from Iris beds. In regions with especially cold winters, lay winter protection over the rhizomes. We recommend straw, evergreen boughs, or anything that will provide air circulation and insulation against the cold. Remove winter protection in the spring. During bloom season, spent blooms, as well as spent branches, can be removed carefully to keep your iris beds looking fresh and colourful.
Break off seedpods that form after the blooms have faded. This prevents seedlings from choking the surrounding soil. Seed formation also saps energy needed by the rhizomes, roots, and leaves.
Dividing and Transplanting Bearded Iris
Iris need to be thinned or divided before they become
overcrowded, generally every 3-5 years. If iris are allowed
to become too crowded the bloom will suffer, some
varieties may crowd others out and disease problems may
be aggravated. Depending on your location, July through
September is the time to divide and transplant Bearded Iris.
Transplanted Iris should be planted a minimum of six weeks before the first hard frost in your area.
|
|
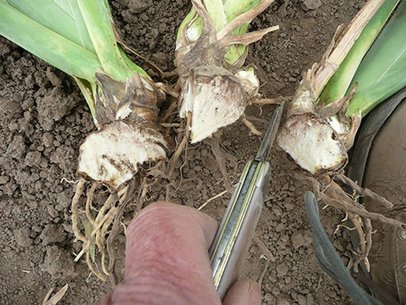
Old clumps may be thinned by carefully cutting out the old divisions at the centers of the clumps and leaving new growth in the ground. In the case of very old and compacted clumps, the process of thinning might be easier if you dig up the entire clump, remove the old "spent" rhizomes, trim the foliage of the new rhizomes and replant them. Smaller shoots may take two years to produce blooms, but larger shoots should bloom the following spring.
We recommend supplementing the soil with a low-nitrogen fertilizer, super phosphate or bone meal when transplanting. These extra nutrients help the new shoots to have the best chance of success in establishing their root systems. Water newly planted rhizomes well initially, and if dry conditions continue then once every 7 to 10 days until the autumn rains begin, to help the new roots become established.
Why Iris Won't Bloom
Lack of bloom can be caused by a number of factors and usually a combination of more than one. They are a bit like people -- give them a bit of room and satisfactory conditions and they will perform well. Here is a list of some of the more common culprits:
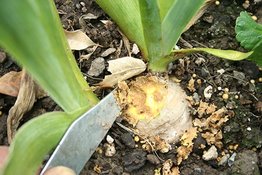
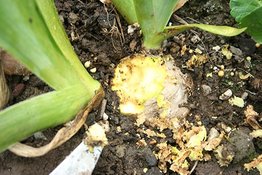
Controlling Disease in Bearded Iris
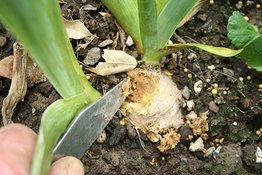
Controlling Rhizome Rot:
Excessive moisture can sometimes lead to outbreaks of bacterial rot. It is imperative that you remove the rotting tissue as soon as possible. Remove the soil from around the rhizome, leaving the roots anchoring the plant. Using an old spoon, carefully scoop out all the mushy tissue. If necessary, dig up the entire plant and remove the rotten tissue. After removing the tissue, drench the wounds with a 10% bleach solution (1 part bleach to 9 parts water) and allow them to dry for several days before covering with soil again.
We recommend supplementing the soil with a low-nitrogen fertilizer, super phosphate or bone meal when transplanting. These extra nutrients help the new shoots to have the best chance of success in establishing their root systems. Water newly planted rhizomes well initially, and if dry conditions continue then once every 7 to 10 days until the autumn rains begin, to help the new roots become established.
Why Iris Won't Bloom
Lack of bloom can be caused by a number of factors and usually a combination of more than one. They are a bit like people -- give them a bit of room and satisfactory conditions and they will perform well. Here is a list of some of the more common culprits:
- Planting in too much shade. They need at least 6 hours of full sun per day.
- Over feeding with animal manure or fertilizer high in Nitrogen.
- No feeding at all. Starved iris will not flower.
- Planting too deeply. Tops of rhizomes should be visible above the soil level. (In extremely hot areas of the country, cover tops of rhizomes with only about 1 inch of loose soil or sand to prevent sun scorching.)
- Mulching with lawn clippings or other organic matter. Don't mulch, as it acts as shade and can cause rhizomes to rot.
- Over or under watering can also cause problems. Plant iris in well-drained soil. Water deeply once every week or two during the dry spring and summer months.
- Overcrowding: they need dividing every 3 to 5 years.
Controlling Disease in Bearded Iris
Controlling Rhizome Rot:
Excessive moisture can sometimes lead to outbreaks of bacterial rot. It is imperative that you remove the rotting tissue as soon as possible. Remove the soil from around the rhizome, leaving the roots anchoring the plant. Using an old spoon, carefully scoop out all the mushy tissue. If necessary, dig up the entire plant and remove the rotten tissue. After removing the tissue, drench the wounds with a 10% bleach solution (1 part bleach to 9 parts water) and allow them to dry for several days before covering with soil again.
|
|
|
|
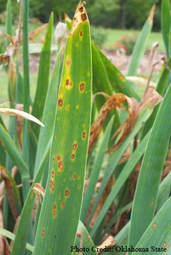
Controlling Leaf Spot:
Excessive moisture from irrigation and rainy or humid weather can lead to this problem known as leaf spot. Always remove old dead leaves, and cut off and destroy any leaf or part of a leaf that is affected by leaf spot. In the spring, about six weeks before bloom, begin a regular spraying program with a fungicide. Using two fungicides alternately is often more effective than using one exclusively. |
|
Controlling Pests in Bearded Iris
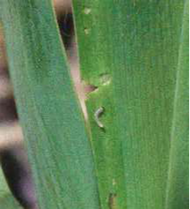
Iris Borer:
In areas where borers live they can pose serious and frustrating problems for the iris grower. Borers begin life as eggs, laid on garden debris in the fall. Each spring, about the time tulips bloom, these eggs hatch into larvae.
Iris Borer:
In areas where borers live they can pose serious and frustrating problems for the iris grower. Borers begin life as eggs, laid on garden debris in the fall. Each spring, about the time tulips bloom, these eggs hatch into larvae.
These 1/4 inch long larvae crawl onto the iris and up the leaves. Near the top they chew into the leaves and then down to the rhizomes, where they gorge themselves until they reach a size of about 1 1/2" in length. Borer injury often appears as notched wounds or slimy wet looking areas on the leaves. Borers often will hollow out whole rhizomes causing the fans to collapse and the remaining tissue to rot.
Keeping a clean garden is the fist step in minimizing borer problems. A sharp eye for signs of borer entry allows some gardeners to catch the borer in the leaf before it travels to the rhizome (simply squash them in the leaves). The most effective control relies on an understanding of the borer's life cycle.
Sometime in the summer the borers change into pupae. These pupae reside in the soil for about a month and then a moth emerges and lays eggs. As pupae, moths and eggs, the borers do not feed. Only as larvae do they eat and do their damage. At this stage they are most vulnerable to our efforts to control them.
Systemic insecticides are considered to be the most effective control of iris borers. Always take care to follow the manufacturer's recommendation when using agricultural chemicals. Imidacloprid has proven effective against iris borers. Check with your local garden center about systemic insecticides that contain this chemical.
A 10% solution of Murphy's Oil Soap (one part soap for every nine parts water) can be used as an organic alternative to commercial chemicals. Diatomaceous Earth is also effective in ridding plants of caterpillars. It shreds the inside of caterpillars when they ingest the dust, but you do have to reapply after a rain or watering as it loses its effectiveness when damp.
Slugs, snails and other pests around Bearded Iris:
In early spring, or when you notice damage from slugs and snails, bait for these pests using whatever method you prefer. Aphids, thrips, and whiteflies can be controlled by a variety of insecticides readily available at garden centers. Insecticidal soaps can also be effective.
Growing Bearded Iris in Containers
Iris can be successfully grown in containers. A 6" to 8" pot will work for Dwarf Iris; a 12" pot will work for Tall Bearded Iris. Make sure your pot has good drainage. For soil, we recommend 45% fir bark, 20% pumice, and 35% peat moss. You can use a general potting soil found at most garden centers. Avoid any potting soil that has high levels of nitrogen. Leave at least one inch below the pot's rim, and leave the top of the rhizome exposed. Water only when the top two inches of soil are dry. Over-watering will cause rot. Keep the pot outdoors during the winter. Divide and transplant your iris per our recommended steps every couple of years.
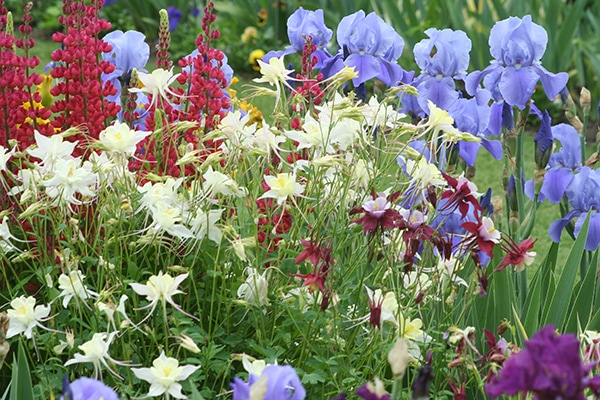
What grows well with Bearded Iris?
The practice of “Companion Planting”, a centuries-old gardening tradition, grew from the proven notion that different plant species, planted close together, assist each other with nutrient production and absorption, controlling pests, attracting pollinators, and other factors necessary for their full productivity. This practice is clearly beneficial in flower gardens as well. When planning your companion plantings for Bearded Iris beds, consider water conservation as well as overall aesthetic design.
Keeping a clean garden is the fist step in minimizing borer problems. A sharp eye for signs of borer entry allows some gardeners to catch the borer in the leaf before it travels to the rhizome (simply squash them in the leaves). The most effective control relies on an understanding of the borer's life cycle.
Sometime in the summer the borers change into pupae. These pupae reside in the soil for about a month and then a moth emerges and lays eggs. As pupae, moths and eggs, the borers do not feed. Only as larvae do they eat and do their damage. At this stage they are most vulnerable to our efforts to control them.
Systemic insecticides are considered to be the most effective control of iris borers. Always take care to follow the manufacturer's recommendation when using agricultural chemicals. Imidacloprid has proven effective against iris borers. Check with your local garden center about systemic insecticides that contain this chemical.
A 10% solution of Murphy's Oil Soap (one part soap for every nine parts water) can be used as an organic alternative to commercial chemicals. Diatomaceous Earth is also effective in ridding plants of caterpillars. It shreds the inside of caterpillars when they ingest the dust, but you do have to reapply after a rain or watering as it loses its effectiveness when damp.
Slugs, snails and other pests around Bearded Iris:
In early spring, or when you notice damage from slugs and snails, bait for these pests using whatever method you prefer. Aphids, thrips, and whiteflies can be controlled by a variety of insecticides readily available at garden centers. Insecticidal soaps can also be effective.
Growing Bearded Iris in Containers
Iris can be successfully grown in containers. A 6" to 8" pot will work for Dwarf Iris; a 12" pot will work for Tall Bearded Iris. Make sure your pot has good drainage. For soil, we recommend 45% fir bark, 20% pumice, and 35% peat moss. You can use a general potting soil found at most garden centers. Avoid any potting soil that has high levels of nitrogen. Leave at least one inch below the pot's rim, and leave the top of the rhizome exposed. Water only when the top two inches of soil are dry. Over-watering will cause rot. Keep the pot outdoors during the winter. Divide and transplant your iris per our recommended steps every couple of years.
What grows well with Bearded Iris?
The practice of “Companion Planting”, a centuries-old gardening tradition, grew from the proven notion that different plant species, planted close together, assist each other with nutrient production and absorption, controlling pests, attracting pollinators, and other factors necessary for their full productivity. This practice is clearly beneficial in flower gardens as well. When planning your companion plantings for Bearded Iris beds, consider water conservation as well as overall aesthetic design.